TinyMCE 4
Introduction
Tinymce is an open source JavaScript WYSIWYG editor that is integrated into Contenido's backend to help authors entering and formatting text. This article is about how its integration is implemented.
Activation
TinyMCE 4 is not enabled by default. One has to manually enable TinyMCE 4 in CONTENIDO. We commend to use TinyMCE only in a new installation of CONTENIDO.
Where TinyMCE 4 can be enabled
Administration -> Users -> Properties -> User-defined properties
Area/Type: wysiwyg
Property: editor
Value: tinymce4
Administration -> System -> Add new variable
Administration -> Clients -> Client settings -> Choose wanted setting range -> Add new variable
Type: wysiwyg
Name: editor
Value: tinymce4
How to disable TinyMCE 4
Remove the settings at the places where you enabled TinyMCE 4. The default WYSIWYG editor in CONTENIDO will then be used.
Settings
Toolbars
full
This is the toolbar of inline-tinymce in fullscreen mode. Apply tinymce settings through key "tinymce4_full".
fullscreen
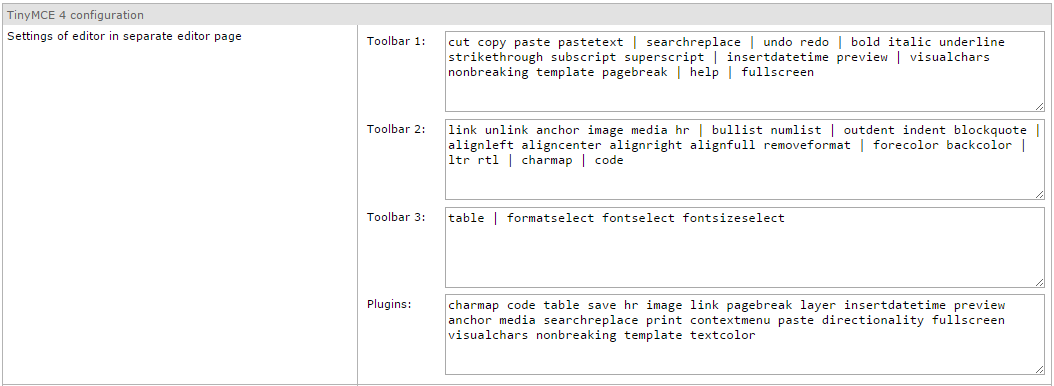
This is the editor on separate edit page. Apply tinymce settings through key "tinymce4_fullscreen".
simple
A simple toolbar without font and table options. Apply tinymce settings through key "tinymce4_simple". Not used at the moment.
mini
A very minimal toolbar, has only undo, redo, bold, italic, underline, strikethrough and link button. Apply settings through key "tinymce4_mini". Not used at the moment.
custom
A custom toolbar. Only tinymce settings through key "tinymce4_custom" are applied. Not used at the moment.
inline_edit
Toolbar of inline editor on edit and raw data tabs in Contenido's backend. Apply settings through key "tinymce4_inline".
default
The default toolbar is used if not specified otherwise in code. Apply settings through key "tinymce4_default". Not used at the moment.
Usage
The editor is used in several files. Here is the list of the files and what they are responsible for.
| File name | Purpose | Called wrapper part |
|---|---|---|
| include_con_content_list.php | Displays raw data of articles | class.tinymce4.editor.php |
| template.con_content_list.html | Template included by include_con_content_list.php to render its page | con_tiny.js, tiny_mce.js |
| include.con_editcontent.php | Displays the editor page of article | class.tinymce4.editor.php |
| template.con_editcontent.html | Template included by include.con_editcontent.php to render its page | con_tiny.js, tinymce.min.js |
| include.CMS_HTML.php | Editor page for content type CMS_HTML | editor.php |
| include.CMS_HTMLHEAD.php | Editor page for content type CMS_HTMLHEAD | editor.php |
| class.tinymce4.editor.php | Returns settings based on backend variables | template.tinymce_tpl.html |
This means editing any CMS_HTML or CMS_HTMLHEAD type in Contenido's backend will bring up the WYSIWYG editor.
Contenido specific wrapper parts
class.wysiwyg_editor.php
Abstract class cWYSIWYGEditor for all WYSIWYG editors to be able to allow possible integration of other editors than tinyMCE in the future. This class is auto-loaded and thus always available.
editor.php
Called by Contenido's pre-defined content types that allow HTML markup. It first loads the editor class then sets the editor's width and height and injects a textarea tag into the output. Outputs "tinymce.tpl.html" to pass settings to output for further processing.
class.tinymce4.editor.php
Defines class cTinyMCE4Editor which extens the abstract cWYSIWYG editor class. It is autoloaded and handles PHP part of setup. As such it collects settings from backend and pre-processes it for later use in JavaScript. It is similar to Contenido's editorclass.php wrapper used by tinymce 3 but it is updated to tinymce 4's new settings and callbacks. Its return values are passed through the templates to the con_tiny.cs file.
class.tinymce_list.php
Builds image and link lists filled with objects related to database values for use in tinymce's image and link plugins.
con_tiny.js
JavaScript that defines "Con.Tiny". Uses its passed through settings and options to initialise Tinymce 4 and defines the callback functions of standard values. It also defines the "close" plugin for the inline editor that adds a save and close button to the inline editor toolbar. As the users may insert images or videos this script integrates Contenido's image and file browsers into Tinymce.
Configuration
Tinymce 4 can be configured through the page at Administration -> System -> WYSIWYG.
There are separate settings available for dedicated editor page, inline editor and inline editor in fullscreen mode


You may also activate the contenido_gzip option (but this is not recommended because web server should be serving compressed content already).
If you activate the jump lists for image and links then users have a dropdown menu available when opening image and link dialogs, providing quick access to images and links. This option will be slow for links with many pages and categories and image list creation will be slow when there are many different images available. By default these options are turned off.
Load external plugins
You can add custom plugins to tinymce 4 using the "External plugins to load" entry. Name should be the name of the plugin and URL is the URL TinyMCE 4 will try to load dynamically using AJAX.
To load several plugins enter one plugin and save the form using the save button. One can then add another plugin. If more than 2 external plugins are wished then save the form and enter another one (the same applies for adding even more plugins).
Additional parameters (JSON passed to tinymce constructor)
This is JSON merged into the main configuration. This content will be merged into the main configuration using PHP's array_merge function.
This example will replace the tinymce 4 inline editor config and configure toolbar2 to contain only the bold button.
{
  "tinymce4_inline": {
    "toolbar2": "bold"
  }
}
Configuration file
The configuration will be saved into the file config.wysiwyg_tinymce4.php in your config folder.
Raw content of configuration page will be saved into $cfg['wysiwyg']['tinymce4']['raw'] but configuration (with the additional parameters merged into config) passed to TinyMCE 4 is stored under the $cfg['wysiwyg']['tinymce4']['tinymce4'] key.
Upgrades
Download source code from Tinymce's website. If you want to be able to debug source code you need the development package, else use the standard packages. Contenido does not use the jQuery package.
Replace the following folder with contents from downloaded package: "contenido/external/wysiwyg/tinymce4/tinymce".
If you've done it correctly the following path exists: "contenido/external/wysiwyg/tinymce4/tinymce/js".
Writing own plugins
As some of the tinymce 3 plugins are gone (specifically advhr, advimage, advlink, inlinepopups, style and xhtmlxtras) you may want to write your own replacement plugins.
Replacement hints
Maybe you want to use tinymce's compat3x plugin to load the legacy code.
General
Contenido itself implements a few own plugins, for instance the close-Plugin and the confullscreen-Plugin inside con_tiny.js inside the tinymce 4 folder. These can be seen as small examples of how a basic plugin can look like. For more complex examples you can download the tinymce 4 development package and check out the non-minified plugins from the creators of tinymce.
Make sure to use tinymce 4's windowManager in order to display model dialogs. Pass custom parameters like in their example to the new window. Their documentation mentions the setParams function to write into the variables you passed to the dialog during opening. Close the dialog window using the tinymce instance in the calling window, e.g. using "parent.tinymce.activeEditor.windowManager.close(window)". Bind the dialog instance you created using the open function of the windowManager using the on function of the instance to the close event.
// open dialog
var diag = ed.windowManager.open({
    title: 'Your window title',
    url: 'url/to/load',
}, {
    oneCustomParameter: false
});

// handle close event of dialog
diag.on('close', function() {
    var args = ed.windowManager.getParams();
    // your code here
});
Update to latest Minor-Release
Downloads
To Update TinyMCE to the latest Minor-Version, download latest TinyMCE from here
You could also download languagepack if needed
Extract & Update
After downloading, unzip folder to your favorit location. You should now have a Folder named tinymce
Go to your contenido folder and browse to your tinymce4 folder
contenido/external/wysiwyg/tinymce4
Rename tinymce to tinymce_backup just to have a backup, in case somethings not working.
Copy/Upload the extracted folder to the previously browsed path so you have a new tinymce folder in your server stucture.
Be sure you have the right tinymce activated
Be sure to clear your browsercache after doing these changes